PHP & Web Development Blogs

Showing 46 to 50 of 64 blog articles.
17008 views · 7 years ago
Why Cloudways is the Perfect Managed Hosting for PHP Applications

The following is a sponsored blogpost by Cloudways


Developing an application is not the sole thing you should bank on. You must strive to find the best hosting solution to deploy that application also. The application’s speed is dependent on the hosting provider, that is why I always advise you to go for the best hosting solution to get the ultimate app performance.

Now a days, it is a big challenge to choose any web hosting, as each hosting has its own pros and cons which you must know, before considering it finally for the deployment. I don’t recommend shared hosting for PHP/Laravel based applications, because you always get lot of server hassles like downtime, hacking, 500 errors, lousy support and other problems that are part and parcel of shared hosting.

For PHP applications, you must focus on more technical aspects like caching, configs, databases, etc. because these are essential performance points for any vanilla or framework-based PHP application. Additionally, if the app focuses on user engagement (for instance, ecommerce store), the hosting solution should be robust enough to handle spikes in traffic.

Here, I would like to introduce Cloudways PHP server hosting to you which provides easy, developer and designer friendly managed hosting platform. With Cloudways, you don't need to focus on PHP hosting, but must focus on building your application. You can easily launch cloud servers on five providers including DigitalOcean, Linode, Vultr, AWS and GCE.


Cloudways ThunderStack


Being a developer, you must be familiar with the concept of stack - an arrangement of technologies that form the underlying hosting solution.

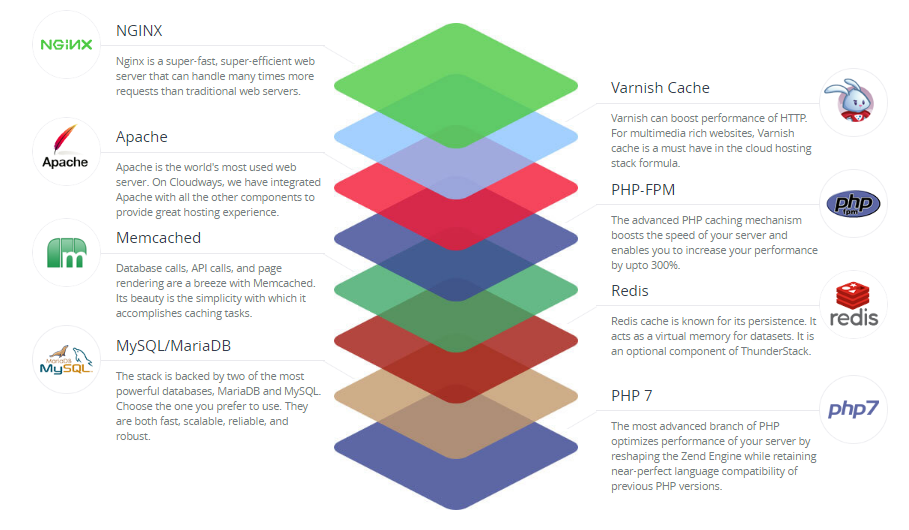
To provide a blazing fast speed and a glitch-free performance, Cloudways has built a PHP stack, known as ThunderStack. This stack consists of technologies that offer maximum uptime and page load speed to all PHP applications. Check out the following visual representation of ThunderStack and the constituent technologies:


alt_text


As you can see, ThunderStack comprises of a mix of static and dynamic caches with two web servers, Nginx and Apache. This combination ensures the ultimate experience for the users and visitors of your application.


Frameworks and CMS


The strength and popularity of PHP lies in the variety of frameworks and CMS it offers to the developers. Realizing this diversity, Cloudways offers a hassle-free installation of major PHP frameworks including Symfony, Laravel, CakePHP, Zend, and Codeigniter. Similarly, popular CMS such as WordPress, Bolt, Craft, October, Couch, and Coaster CMS - you can install these with the 1-click option. The best part is that if you have a framework or CMS that is not on the list, you can easily install it through Composer.


1-Click PHP Server & Application Installation


Setting up a stack on an unmanaged VPS could take an entire day!

When you opt for Cloudways managed cloud hosting, the entire process of setting up the server, installation of core PHP files and then the setup of the required framework is over in a matter of minutes.

Just sign up at Cloudways, choose your desired cloud provider, and select the PHP stack application.

alt_text


As you can see, your LAMP stack is ready for business in minutes.

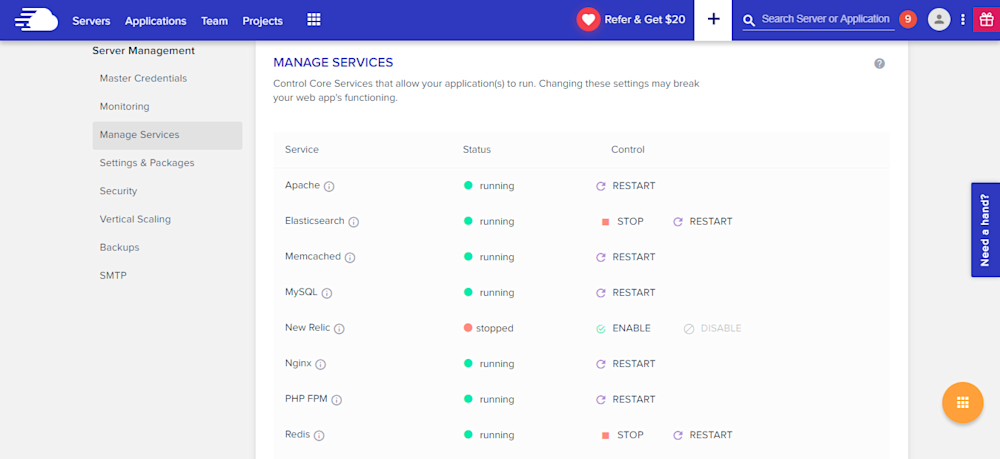
Many PHP applications fail because essential services are either turned off or not set up properly. Cloudways offers a centralized location where you can view and set the status of all essential services such as:


* Apache
* Elasticsearch
* Memcached
* MySQL
* PHP-FPM
* Nginx
* New Relic
* Redis
* Varnish

alt_text


Similarly, you can manage SMTP add-ons without any fuss.


Staging Environment


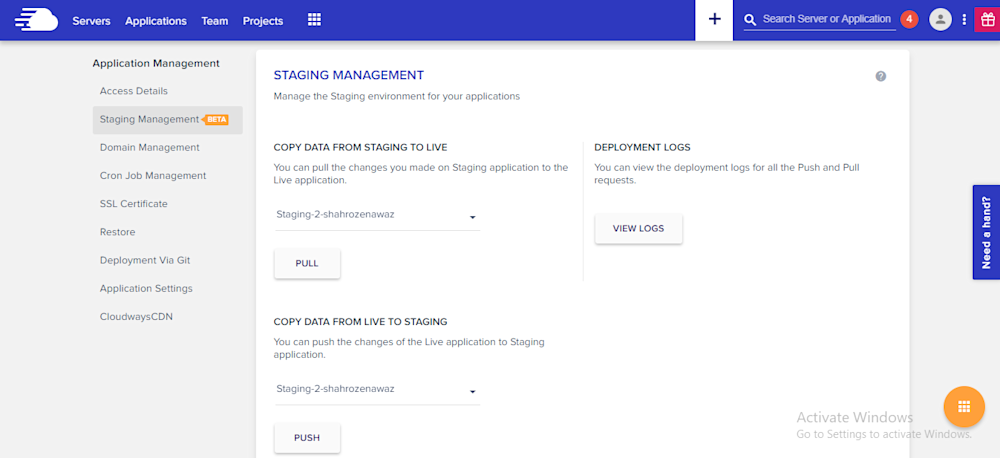
With Cloudways, you can test your web applications for possible bugs and errors before taking it live.

Using the staging feature, developers can first deploy their web sites on test domains where they can analyze the applications performance and potential problems. This helps site administrators to fix those issues timely and view the application performance in real-time.

A default sub domain comes pre-installed with the newly launched application, making it easy for the administrators to test the applications on those testing subdomains. Overall, it's a great feature which helps developers know about the possible errors that may arise during the live deployment.
alt_text

Pre-Installed Composer & Git


PHP development requires working with external libraries and packages. Suppose you are working with Laravel and you need to install an external package. Since Composer has become the standard way of installing packages, it comes preinstalled on the Cloudways platform. Just launch the application and start using Composer in your project.

Similarly, if you are familiar with Git and maintain your project on GitHub or BitBucket, you don’t need to worry about Git installation. Git also comes pre-configured on Cloudways. You can start running commands right after application launch.


Cloudways MySQL Manager


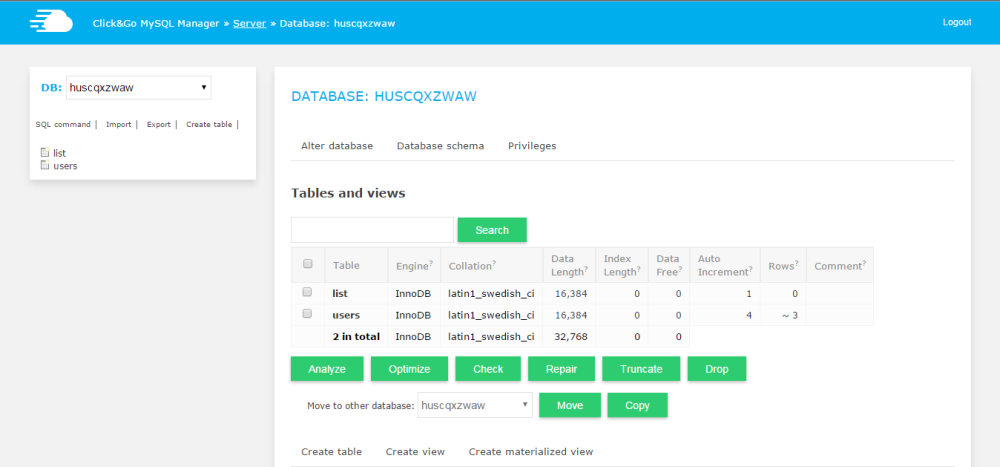
When you work with databases in PHP, you need a database manager. On the Cloudways platform, you will get a custom-built MySQL manager, in which you can perform all the tasks of a typical DB manager.
alt_text


However, if you wish to install and use another database manager like PHPMyAdmin, you can install it by following this simple guide on installing PHPMyadmin.


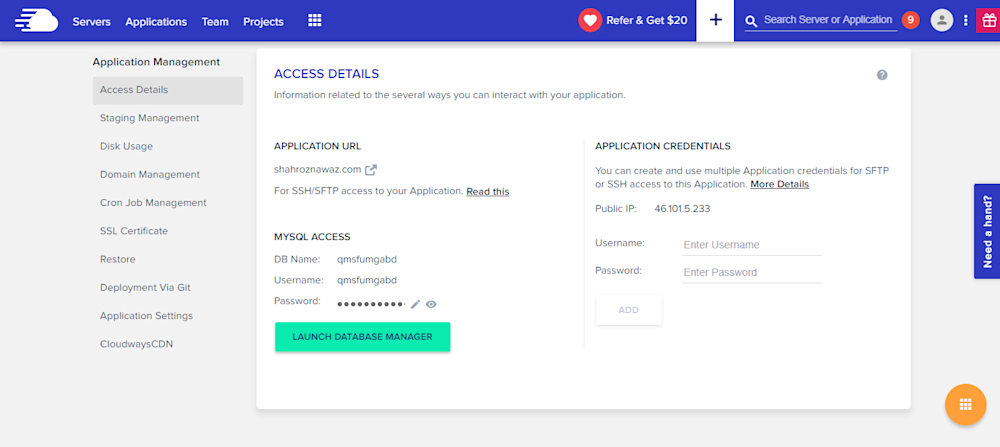
Server & Application Level SSH


If you use Linux, you typically use SSH for accessing the server(s) and individual applications. A third-party developer requires application and server level access as per the requirements of the client. Cloudways offers SSH access to fit the requirements of the client and users.
alt_text


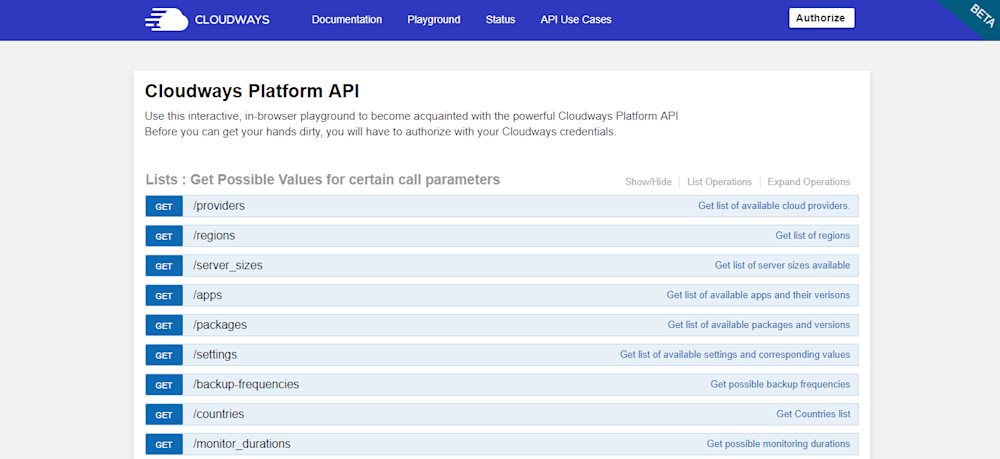
PHP-FPM, Varnish & Cron Settings


Cloudways provides custom UI panel to set and maintain PHP-FPM and Varnish settings. Although the default configuration is already in place, you can easily change all the settings to suit your own, particular development related requirements. In Varnish settings, you can define URL that you want to exclude from caching. You can also set permissions in this panel.
alt_text


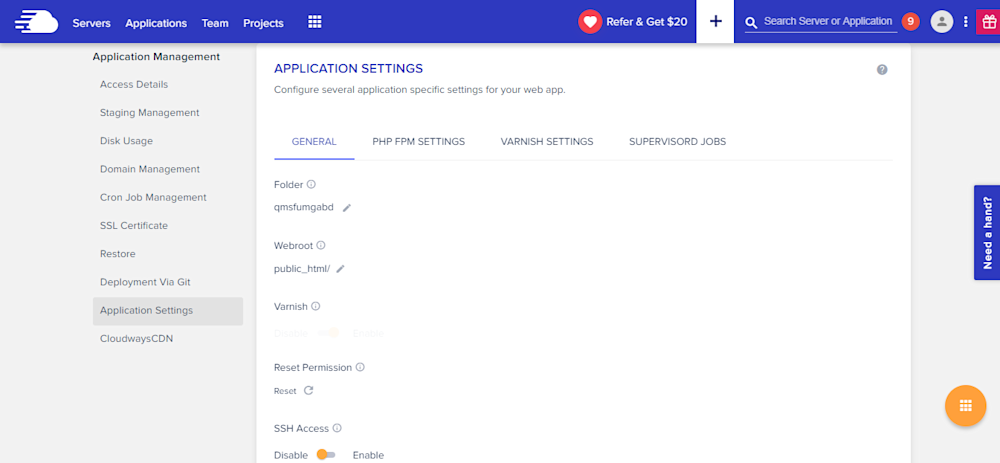
Cron job is a very commonly used component of PHP application development process. On Cloudways platform, you can easily set up Cron jobs in just a few clicks. Just declare the PHP script URL and the time when the script will run.
alt_text


Cloudways API & Personal Assistant Bot


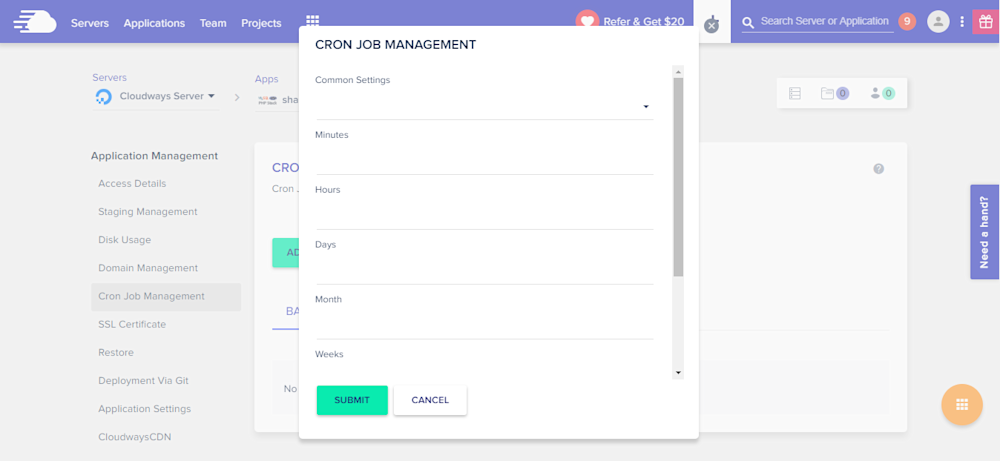
Cloudways provides an internal API that offers all important aspects of the server and application management. Through Cloudways API, you can easily develop, integrate, automate, and manage your servers and web apps on Cloudways Platform using the RESTful API. Check out some of the use cases developed using Cloudways API. You just need your API key and email for authentication of the HTTP calls on API Playground and custom applications.
alt_text


Cloudways employs a smart assistant named CloudwaysBot to notify all users about server and application level issues. CloudwaysBot sends the notifications on pre-approved channels including email, Slack and popular task management tools such as Asana and Trello.


Run Your APIs on PHP Stack


Do you have your own API which you want to run on the PHP stack? No problem, because you can do that, too with Cloudways! You can also use REST API like Slim, Silex, Lumen, and others. You can use APIs to speed up performance and require fast servers with lots of resources. So, if you think that your API response time is getting slower due to the large number of requests, you can easily scale your server(s) with a click to address the situation.


Team Collaboration


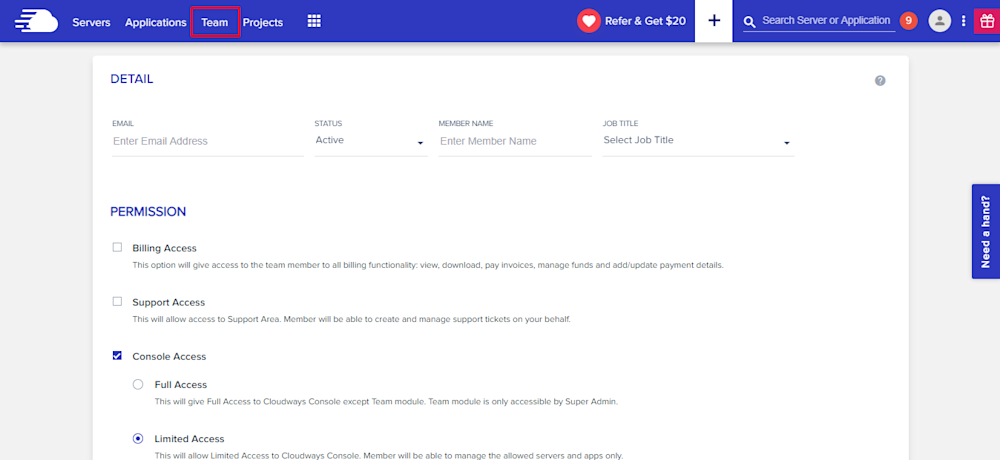
When you work on a large number of applications with multiple developers, you need to assign them on any specific application. Cloudways provides an awesome feature of team collaboration through which you can assign developers to specific application and give access to them. You can use this tool to assign one developer to multiple applications. Through team feature, you can connect the team together and work on single platform. Access can be of different type; i.e. billing, support and console. You can either give the full access or a limited one by selecting the features in Team tab.
alt_text


Final Words


Managed cloud hosting ensures that you are not bothered by any hosting or server related issues. For practical purposes, this means that developers can concentrate on writing awesome code without worrying about underlying infrastructure and hosting related issues. Do sign up and check out Cloudways for the best and the most cost-effective cloud hosting solution for your next PHP project!

7115 views · 6 years ago
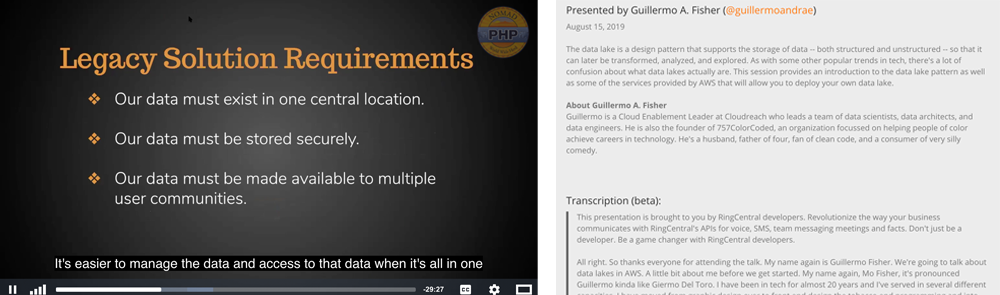
New Beta: Transcriptions and Closed Captioning

With the mission of making technology more accessible, I'm pleased to announce a beta of transcriptions and closed captioning on select videos.

This beta offers a more in-depth look into videos before watching them, the ability to dig into the video's text afterwards for review, and the ability to watch the video with closed captioning assistance.

Closed Captioning may be enabled on the video player by clicking the [cc] icon and selecting your preferred language (at this time, only English is supported). You may also find a transcription of the talk below the description for more insight into the talk before watching, or to find specific information/ sections afterwards for review.

Example of Captions and Transcriptions

As our first attempt at transcriptions and closed captions, it won't be perfect, but if it is beneficial this is something we hope to bring to all future videos, and selectively add closed captioning to past videos based on demand and availability.

.

Today the following videos are available to watch with closed captioning:


* Data Lakes in AWS
* The Dark Corners of the SPL
* Git Legit
* Advanced WordPress Plugin Creation
* The Faster Web Meets Lean and Mean PHP

.

Closed Captioning for Live Events

Unfortunately, at this time we are not able to offer closed captioning for live events including our monthly meetings, workshops, and streamed conferences. This is an area we are continuing to look into, and working on identifying partners to make possible in the future.

.

Providing Feedback/ Requesting Closed Captioning

If you have a specific request for a video you would like to see closed captioned, please let us know using the Nomad PHP feedback form.

.

Next on the Roadmap


Also look for these new features coming over the next several months:
* Lightning talks
* Team management for team account owners
* Mobile Apps for Android/ iOS with offline viewing
10939 views · 7 years ago
Now that the Thanksgiving and Black Friday are left behind, we're all back at our desks, some of us having PHPStorm open for the whole day. In this post, I'll say a few words on this beautiful IDE, PHPUnit and XDebug.
You know that unit tests are essential, don't you? So do the PHPStorm developers. This industry-standard level IDE has tons of capabilities for integrating test frameworks and debuggers into your project. Even if you use VMs or containers to run your development environment, chances are they got you covered!

Blind Pew from Treasure Island

I often see even experienced PHP programmers debugging their code with var_dump(), which is obviously not the best way to do it. If you see the code for the first time, if you work with legacy code - step-by-step interactive debugging is the way to go. Sometimes it can save you hours of old school var_dumping.

As of unit tests, I often hear that it's good enough to run tests from the terminal. I even know a guy who runs watch phpunit /path/to/test while developing: this way the test is run every 2 seconds, you switch to the terminal whenever you want to see the latest results and that's it. However, there are certain advantages in running tests from the IDE. First, it's super-handy to launch a test method, test class or a whole folder with tests, just by pressing a hotkey. Second, the test results appear right there, in PHPStorm, with failures and their stack traces, every entry clickable and takes you directly to the file:line where a nasty thing happened. I also find the ability to run a debugger for a unit test, extremely attractive. Test fails, you click on a trace entry, get to a problematic line, place a break point, re-run the test in debug mode - and there you go.

For all those integrations, you will first need to setup the PHP interpreter for the project: Configuring PHP Development Environment. You will find both local and remote interpreter setups. "Local" is the PHP that you have on your workstation, the host machine. "Remote" can be pretty much everything: SSH if your Dev environment runs on a shared sandbox for all developers, docker or docker-compose if you run it using docker containers.

Next step - creating PHPUnit configuration. Go toSettings -> Languages and Frameworks -> PHP -> Test Frameworks. Follow this guide, it has much more information which will be more up-to-date than this post.Don't forget to set Path Mappings for your remote environments! That is, you probably have your project in, say, $HOME/projects/cool-project, but inside a docker or on a remote host it might be located at /app or /var/www, then you have to let PHPStorm know about this.

Once you're done with PHPUnit setup, you can finally run your tests! The default shortcut on my Linux machine isCtrl+Shift+F10 (shortcuts are usually different on Mac though). Place a cursor inside a test method, press the shotcut: PHPStorm will launch PHPUnit withthat particular test method! When the cursor in a scope of test class but not inside a test method - the whole test class will be run. And, you also can select a whole folder with tests, in the project tree and run it, ain't that cool?

A small tip for the docker-compose lovers. When I first set PHPStorm integration with docker-compose and ran the tests, I was quite surprised (unpleasantly) to see that myphp-fpm service that I was connecting to, is gone after the test process is finished. Took me some time to figure out that it's PHPStorm's expected behavior. It stops the target service after it's done testing. A workaround I started to use is as follows: I just add another service calledphpunit which uses a php-fpm or php-cli image, and is not needed by anything except unit testing in PHPStorm.

Now to debugging.


Debugging is like being the detective in a crime movie where you are also the murderer. Filipe Fortes a.k.a. @fortes


Obviously, your PHP interpreter in development environment will need a debugger extension in order for you to debug interactively. PHPStorm support the two most widely used options: XDebug and Zend Debugger. When using docker I usually make a separate Dockerfile for development, using production image as base, then add development tools,XDebug being the most important. Honestly, I've never usedZend Debugger, so have little to tell about its' nuances.

Got an extension? Go to Debugging Ultimate Guide! Debugger settings in PHPStorm are atSettings -> Languages and Frameworks -> PHP -> Debug. Most of the time you don't need to change them.Again, a note for docker-compose users. There is an XDebug setting that allow debugger to resolve the client (PHPStorm) IP address:xdebug.remoteconnect_back_. That's a disappointment but those will not work, at least with a default docker-compose setup. Thing is, all containers in a compose stack are running behind a network proxy provided by docker-compose. That is, the REMOTE_ADDR for all the containers will always be the IP of proxy. A workaround:

* disablexdebug.remoteconnect_back_;
* add.user.ini to the application root folder with the following contents:xdebug.remotehost = 192.168.X.X_ (your machine's IP address in the LAN). It's generally a good idea to exclude.user.ini from VCS control.

As a conclusion: if you still usevardump()_ to debug, stop living in the stone age, upgrade your knowledge and become more productive! If you don't write unit tests, start doing it. If your managers say it's a waste of time, tell them that it's coding without tests that is a waste of time. And, if you find this post of any use, or have an opinion, or a question - please do comment!
24360 views · 7 years ago
How to install PHPUnit

PHPUnit is an essential tool for every PHP developers. It is one of those tools that every PHP developer should have installed in their development environment. The problems most first time PHPUnit developers run into are where to install it and how to install it. This quick guide will walk you through the process and answer both questions.

How do I install PHPUnit

The Easy Way

In your project’s root directory use this command.

composer require --dev phpunit/phpunit ^6.0


This command adds PHPUnit to your project as a development dependency. This is the absolute best way to install PHPUnit. It is the best way because this way the version of PHPUnit does not change unless you change it. We specified ^6.0 as the version which means we’ll get all the updates to the 6.0 branch but not 6.1. While BC breaks don’t happen often in PHPUnit, they have happened. If you have a globally installed version of PHPUnit and you upgrade it to a version that breaks BC, you have to go update all of your tests immediately. This is a lot of hassle if you have a lot of projects with a lot of tests. Keeping a copy of PHPUnit installed as a dev requirement in each project means that each project has its own copy that can be upgraded as necessary.

The Hard Way

In a command prompt regardless of where you are in your file system, use this command.

composer global require phpunit/phpunit ^6.0


On MacOS and Linux machines, this will install PHPUnit in ~/.composer/vendor/bin. If you add this directory to your path, then from any project, you can execute PHPUnit. However, as noted above, if you ever upgrade your globally installed packages then you will have problems.

composer global update


Run that when there is a new version of PHPUnit, it will be installed, regardless of whether this will break your existing unit tests on one or more of your projects. Windows users will need to locate the .composer/vendor/bin directory in your user’s home directory.

The “ZOMG why would you do it this way” Way

Here is the old-school use wget and move it into the correct position manually. You can do it this way, but you will have to take care of all upgrades manually as well. If you only have a single project on the computer and you never ever plan on changing the version of PHPUnit….nope, still better to usecomposer require --dev.

wget https://phar.phpunit.de/phpunit-6.0.phar


chmod +x phpunit-6.0.phar


sudo mv phpunit-6.0.phar /usr/local/bin/phpunit


phpunit --version


These instructions are of course for MacOS or Linux. Windows user won’t need to do chmod or sudo but will need a BAT file.

That’s it. One of those commands should get you a working copy of PHPUnit on your computer.

Resources:

* Installing PHPUnit
* Composer Introduction (For the Global option)
23713 views · 7 years ago
Install Composer for PHP

Composer is a must-have tool for every PHP developer these days. This page is a simple breakdown of quick-install instructions.

How do I install composer?
   

. Use PHP to download the composer installer, place it in the current directory, and name it composer-setup.php


    . Use PHP to check the hash of the file you downloaded and compare it to the known value of the hash. You can always find the current value of the hash for the installer on the Composer Public Keys / Signatures page.
   
. Run the setup program to install composer. This does more than just download the latest copy of composer, it also sets up your local ~/.composer directory. This will install composer into the current directory. You can add the --install-dir=DIR to specify where you want composer installed. You can also specify --filename=composer to change the installed filename. You can use anything you like that doesn’t already exist in your specified directory, you don’t have to use the name composer. This is a great way to get rid of the .phar at the end of the name if you don’t like it.
   
. Use PHP to remove the installer from the current directory.

To install composer for PHP you use PHP to download the installer, set a few options, and then actually perform the install.

php -r "copy('https://getcomposer.org/installer', 'composer-setup.php');"

php -r "if (hash_file('SHA384', 'composer-setup.php') === '55d6ead61b29c7bdee5cccfb50076874187bd9f21f65d8991d46ec5cc90518f447387fb9f76ebae1fbbacf329e583e30') { echo 'Installer verified'; } else { echo 'Installer corrupt'; unlink('composer-setup.php'); } echo PHP_EOL;"

php composer-setup.php

php -r "unlink('composer-setup.php');"


Below is a version you can copy ‘n paste.

Breakdown:

Recommended Setup for Linux and macOS:

php -r "copy('https://getcomposer.org/installer', 'composer-setup.php');"

php -r "if (hash_file('SHA384', 'composer-setup.php') === '55d6ead61b29c7bdee5cccfb50076874187bd9f21f65d8991d46ec5cc90518f447387fb9f76ebae1fbbacf329e583e30') { echo 'Installer verified'; } else { echo 'Installer corrupt'; unlink('composer-setup.php'); } echo PHP_EOL;"

php composer-setup.php --install-dir=/usr/local/bin --filename=composer

php -r "unlink('composer-setup.php');"

WARNING: Line two IS WHERE IT compares the hasH of the installer you just downloaded to a hard-coded value. The value specified in the script is the value for the current version of the installer as of this writing. If it fails, check the Composer Public Keys / Signatures page and get the latest version. Plug it into the script below and try again.

Windows user, change the --installdir= to a directory in your path.

Recommended Setup for Windows

If you are running Microsoft Windows, the instructions above will work for you as long as you use the proper install paths. You can however download ComposerSetup.exe from the Composer Introduction page. Execute this and it will install composer and set your path so that you can run composer from anywhere. You will have to close your terminal window and open a new one after the install for the path to be updated.

That’s it, you should now have Composer installed.

Composer installation Resources

* Composer Homepage
* Composer Introduction
* Download Composer
* Composer Public Keys / Signatures

SPONSORS

PHP Tutorials and Videos