
Learn from your fellow PHP developers with our PHP blogs, or help share the knowledge you've gained by writing your own.

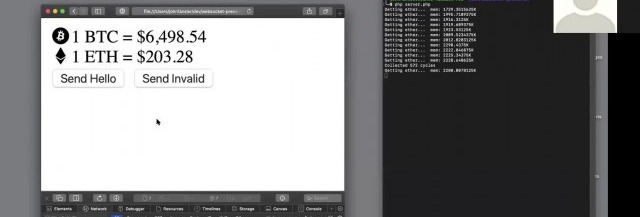
WebSockets have compatibility with 96.5% of clients globally
OnConnection method.OnOpen gets called when a new connection is made.OnClose gets called when a client quits. It's essential to keep an eye on memory management, and essential to keep tidying up as you move through the code.OnError gets called when there is an exception faced by the user.OnMessage gives the text of the JSON message, which is being exchanged with the client.
<form method="post" enctype="multipart/form-data"> @csrf <div class="custom-file"> <input type="file" accept=".csv" name="excel" class="custom-file-input" id="customFile" /> <label class="custom-file-label" for="customFile">Choose file</label	> </div> <div> <button type="submit" class="btn btn-primary btn-sm" style="margin-top: 10px"	>Submit> </div>

</form>
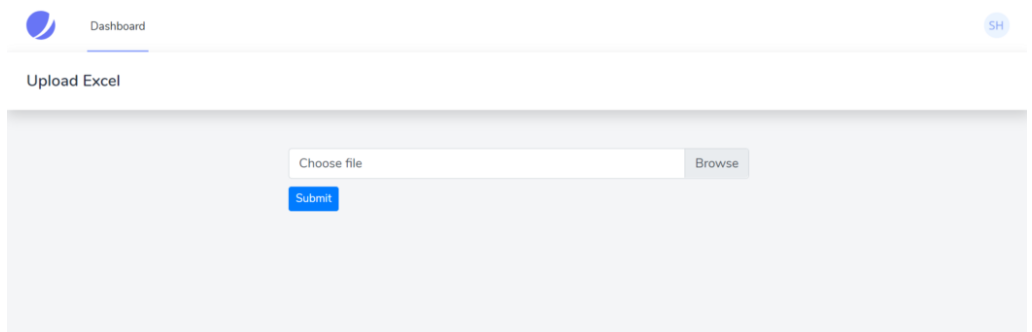
php artisan make:controller UploadController
Route::post('/upload', [UploadController::class, 'upload'])->name('upload')->middleware('auth');
<form method="post" action="{{route('upload')}}" enctype="multipart/form-data">
$file = $request->file('excel');
if (($handle = fopen($file, "r")) !== FALSE) { while (($data = fgetcsv($handle, 1000, ",")) !== FALSE) { ..... }

}
{ "name": "test", "job": "test"

}
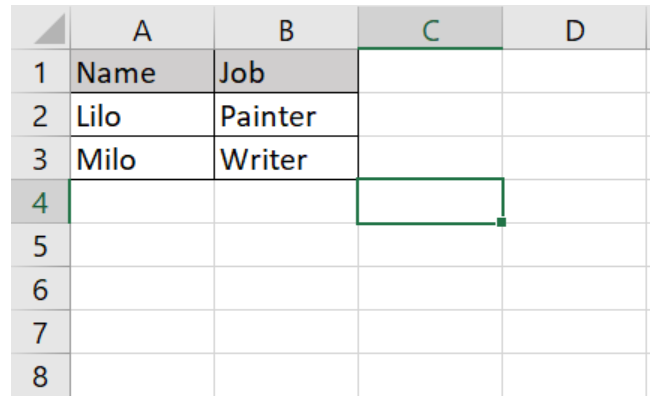
if (($handle = fopen($file, "r")) !== FALSE) { while (($data = fgetcsv($handle, 1000, ",")) !== FALSE) { Http::post('https://reqres.in/api/users', [ 'name' => $data[0], 'job' => $data[1], ]); }

}
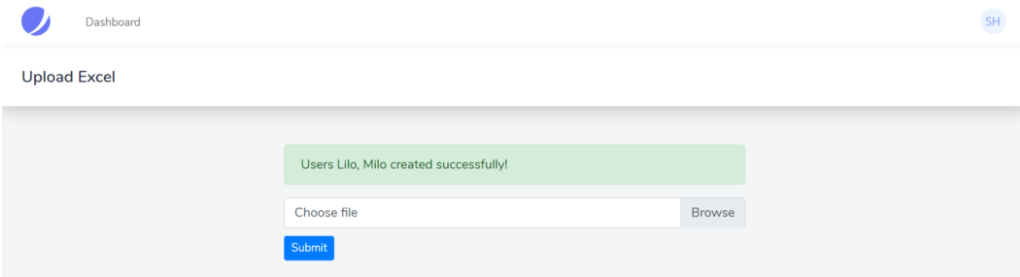
public function upload(Request $request){ $file = $request->file('excel'); if($file){ $row = 1; $array = []; if (($handle = fopen($file, "r")) !== FALSE) { while (($data = fgetcsv($handle, 1000, ",")) !== FALSE) { if($row > 1){ Http::post('https://reqres.in/api/users', [ 'name' => $data[0], 'job' => $data[1], ]); array_push($array,$data[0]); } $request->session()->flash('status', 'Users '.implode($array,", ").' created successfully!'); $row++; } } }else{ $request->session()->flash('error', 'Please choose a file to submit.'); } return view('dashboard');

}
<div class="container max-w-7xl mx-auto sm:px-6 lg:px-8" style="width: 50%"> @if (session('status')) <div class="alert alert-success"> {{ session('status') }} </div> @endif @if (session('error')) <div class="alert alert-error"> {{ session('error') }} </div> @endif <form action="{{route('upload')}}" method="post" enctype="multipart/form-data"> @csrf <div class="custom-file"> <input type="file" accept=".csv" name="excel" class="custom-file-input" id="customFile" /> <label class="custom-file-label" for="customFile">Choose file</label> </div> <div> <button type="submit" class="btn btn-primary btn-sm" style="margin-top: 10px">Submit</button> </div> </form>

</div>

CREATE TABLE IF NOT EXISTS <code>subscribers</code> (
 <code>id</code> int(11) NOT NULL,
 <code>name</code> varchar(255) NOT NULL,
 <code>email</code> varchar(255) NOT NULL,
 <code>createdAt</code> timestamp NOT NULL DEFAULT CURRENT_TIMESTAMP
) ENGINE=InnoDB DEFAULT CHARSET=latin1;

ALTER TABLE <code>subscribers</code> ADD PRIMARY KEY (<code>id</code>);

ALTER TABLE <code>subscribers</code> MODIFY <code>id</code> int(11) NOT NULL AUTO_INCREMENT;


CREATE TABLE IF NOT EXISTS <code>notifications</code> (
 <code>id</code> int(11) NOT NULL,
 <code>to_user</code> int(11) NOT NULL,
 <code>title</code> varchar(255) NOT NULL,
 <code>body</code> varchar(255) NOT NULL,
 <code>url</code> varchar(255) NOT NULL,
 <code>is_sent</code> int(11) NOT NULL DEFAULT '0',
 <code>createdAt</code> timestamp NOT NULL DEFAULT CURRENT_TIMESTAMP
) ENGINE=InnoDB DEFAULT CHARSET=latin1;

ALTER TABLE <code>notifications</code> ADD PRIMARY KEY (<code>id</code>);

ALTER TABLE <code>notifications</code> MODIFY <code>id</code> int(11) NOT NULL AUTO_INCREMENT;
<?php
session_start();
$servername = "localhost";
$username = "root";
$password = "";
$dbname = "web_notifications";

$conn = new mysqli($servername, $username, $password, $dbname);
if ($conn->connect_error) {
 die("Connection failed: " . $conn->connect_error);
}
?>
function WriteCookie(key,content) {
 var now = new Date();
 now.setMonth( now.getMonth() + 1 );
 document.cookie = key+"=" + escape(content) + ";";
 document.cookie = "expires=" + now.toUTCString() + ";"
}

function ReadCookie(key) {
 var allcookies = document.cookie;
 cookiearray = allcookies.split(';');
 var CookieData=Array();
 for(var i=0; i<cookiearray.length; i++) {
 k = cookiearray[i].split('=')[0];
 v = cookiearray[i].split('=')[1];
 CookieData[k]=v;
 }
 return CookieData[key];
}
<?php require 'db_connect.php';

$sql = "SELECT id,title,body,url FROM notifications where to_user='".@$_GET['user_id']."' and is_sent='0' ";
$result = $conn->query($sql);

$data=array();
if ($result->num_rows > 0) {
 while($row = $result->fetch_assoc()) {
 $data[]=$row;

 $upd = "update notifications set is_sent='1' where id='".$row['id']."' ";
 $conn->query($upd);

 }
}

if(count($data)>0)
{
 $response=array("status"=>1,"notification"=>$data);
}
else
{
 $response=array("status"=>0,"error"=>"No new notification!");
}

echo json_encode($response);

$conn->close();
?>
<?php require 'db_connect.php'; ?>
<!DOCTYPE html>
<html>
<head>
 <title>Web Push Notification Demo</title>
 <script src="./cookies.js" type="text/javascript"></script>
 <link href="
<script src="
<script src="
<link rel="stylesheet" href="https://use.fontawesome.com/releases/v5.1.0/css/all.css" integrity="sha384-lKuwvrZot6UHsBSfcMvOkWwlCMgc0TaWr+30HWe3a4ltaBwTZhyTEggF5tJv8tbt" crossorigin="anonymous">
<?php
if(isset($_POST['subscribe_form']))
{
 $_SESSION['is_login']=0;
 $username=$conn->real_escape_string($_POST['username']);
 $useremail=$conn->real_escape_string($_POST['useremail']);


 $sql = "INSERT INTO subscribers set name='".$username."',email='".$useremail."' ";
 if ($conn->query($sql) === TRUE) {
 $_SESSION['is_login']=1;
 $_SESSION['Uid']= $conn->insert_id;
 $_SESSION['Uname']= $username;
 ?>
 <script type="text/javascript">
 WriteCookie("Uid","<?php echo $_SESSION['Uid']; ?>");
 </script>
 <?php
 $msg="<p style='color:green'>You have subscribe for push notification succesfully :)</p>";
 } else {
 $msg="<p style='color:red'>Error in subscribing for notifications</p>";
 }


}

?>
<div class="container">
<?php
if(isset($msg) && $msg!='')
{
 ?>
 <br>
 <div class="alert alert-info">
 <?php echo $msg; ?>
 </div>
 <?php
}

if(isset($_SESSION['is_login']) && $_SESSION['is_login']==1)
{
 ?>
 <h2>Welcome <?php echo $_SESSION['Uname']; ?></h2>
 <script type="text/javascript">

setInterval(function(){
 check_notification();
}, 10000);

function check_notification()
{
 var Uid=ReadCookie("Uid");
 if(Uid!==undefined)
 {
 $.ajax({url: "fetch_notifications.php?user_id="+Uid, success: function(result){
 var response=JSON.parse(result);
 if(response.status==1)
 {

 response=response.notifications;
 for (var i = response.length - 1; i >= 0; i--) {
 var url = response[i]['url'];
 var noti = new Notification(response[i]['title'], {
 icon: 'logo.png', body: response[i]['body'],
 });
 noti.onclick = function () {
 window.open(url);
 noti.close();
 };

 };

 }
 else{
 console.log(response.error);

 }

 }

 });
 }
}


 </script>
 <?php
}
else
{
 ?>
 <h2 class="text-center">Subscribe for Notifications</h2>
 <div class="row justify-content-center">
 <div class="col-12 col-md-8 col-lg-6 pb-5">

 <div class="card border-primary rounded-0">
 <div class="card-header p-0">
 <div class="bg-info text-white text-center py-2">
 <h3><i class="fa fa-envelope"></i> Information</h3>
 <p class="m-0">provide your information</p>
 </div>
 </div>
 <div class="card-body p-3">
 <form method="post">
 <!--Body-->
 <div class="form-group">
 <div class="input-group mb-2">
 <div class="input-group-prepend">
 <div class="input-group-text"><i class="fa fa-user text-info"></i></div>
 </div>
 <input type="text" class="form-control" id="username" name="username" placeholder="Input Your Name Here" required>
 </div>
 </div>
 <div class="form-group">
 <div class="input-group mb-2">
 <div class="input-group-prepend">
 <div class="input-group-text"><i class="fa fa-envelope text-info"></i></div>
 </div>
 <input type="text" class="form-control" id="useremail" name="useremail" pattern="[^@\s]+@[^@\s]+\.[^@\s]+" title="Invalid email address" placeholder="[email protected]" required>
 </div>
 </div>

 <div class="text-center">
 <input type="submit" value="Subscribe" name="subscribe_form" class="btn btn-info btn-block rounded-0 py-2">
 </div>
 </form>
 </div>

 </div>


 </div>
 </div>
<?php }?>
</div>


</head>
<body>

</body>
</html>
<?php
$conn->close();
?>

CREATE TABLE IF NOT EXISTS <code>admin</code> (
 <code>id</code> int(11) NOT NULL,
 <code>username</code> varchar(255) NOT NULL,
 <code>password</code> varchar(255) NOT NULL,
 <code>createdAt</code> timestamp NOT NULL DEFAULT CURRENT_TIMESTAMP
) ENGINE=InnoDB DEFAULT CHARSET=latin1;

ALTER TABLE <code>admin</code> ADD PRIMARY KEY (<code>id</code>);

ALTER TABLE <code>admin</code> MODIFY <code>id</code> int(11) NOT NULL AUTO_INCREMENT;

INSERT INTO <code>web_notifications</code>.<code>admin</code> (<code>id</code>, <code>username</code>, <code>password</code>, <code>createdAt</code>) VALUES (NULL, 'admin', MD5('123456'), CURRENT_TIMESTAMP);
<?php require 'db_connect.php'; ?>
<!DOCTYPE html>
<html>
<head>
 <title>ADMIN PAGE</title>
 <link href="
<script src="
<script src="
<link rel="stylesheet" href="https://use.fontawesome.com/releases/v5.1.0/css/all.css" integrity="sha384-lKuwvrZot6UHsBSfcMvOkWwlCMgc0TaWr+30HWe3a4ltaBwTZhyTEggF5tJv8tbt" crossorigin="anonymous">
<?php
if(isset($_POST['login']))
{
 $_SESSION['admin_login']=0;
 $username=$conn->real_escape_string($_POST['username']);
 $password=$conn->real_escape_string($_POST['password']);
 $sql = "SELECT * FROM admin where username='".$username."' and password='".md5($password)."' ";
 $result = $conn->query($sql);
 if ($result->num_rows > 0) {
 $_SESSION['admin_login']=1;
 $msg="<p style='color:green'>Admin Logged-in Successfully :)</p>";
 }
 else {
 $msg="<p style='color:red'>INVALID CREDENTIALS FOR ADMIN</p>";
 }


}
if(isset($_POST['add_notification']))
{
 $title=$conn->real_escape_string($_POST['title']);
 $body=$conn->real_escape_string($_POST['body']);
 $url=$conn->real_escape_string($_POST['url']);
 $users=$_POST['users'];

 foreach ($users as $user_id) {
 $ins = "insert into notifications set to_user='".$user_id."' , title='".$title."', url='".$url."', body='".$body."' ";
 $conn->query($ins);
 }
 $msg="<p style='color:green'>Notification(s) added to subscribers account.</p>";

}

?>
<div class="container">
<?php
if(isset($msg) && $msg!='')
{
 ?>
 <br>
 <div class="alert alert-info">
 <?php echo $msg; ?>
 </div>
 <?php
}

if(isset($_SESSION['admin_login']) && $_SESSION['admin_login']==1)
{
 ?>
 <h2>Welcome Admin, Send notification to Subscriber(s)</h2>

<form method="post">


<div class="form-group">
 <label for="sel1">Select Subscriber(s):</label>
 <select multiple="multiple" required="required" class="form-control" id="users" name="users[]">
 <?php
$sql = "SELECT id,name FROM subscribers";
$result = $conn->query($sql);

$data=array();
if ($result->num_rows > 0) {
 while($row = $result->fetch_assoc()) {
 echo "<option value='".$row['id']."'>".$row['name']."</option>";
 }
}
?>
 </select>
</div>

 <div class="form-group">
 <label for="email">Title</label>
 <input type="text" required class="form-control" placeholder="notification title here" name="title" id="title">
 </div>

 <div class="form-group">
 <label for="email">Message</label>
 <textarea required class="form-control" placeholder="notification message here" name="body" id="body"></textarea>
 </div>

 <div class="form-group">
 <label for="email">Url</label>
 <input type="url" required class="form-control" placeholder="notification landing/click url here" name="url" id="url">
 </div>

 <input type="submit" class="btn btn-primary btn-block" name="add_notification" value="Submit" />

</form>


 <?php
}
else
{
 ?>
 <h2 class="text-center">ADMINISTRATOR</h2>
 <div class="row justify-content-center">
 <div class="col-12 col-md-8 col-lg-6 pb-5">

 <div class="card border-primary rounded-0">
 <div class="card-header p-0">
 <div class="bg-info text-white text-center py-2">
 <h3><i class="fa fa-envelope"></i> LOGIN</h3>
 <p class="m-0">provide admin login credentials</p>
 </div>
 </div>
 <div class="card-body p-3">
 <form method="post">
 <!--Body-->
 <div class="form-group">
 <div class="input-group mb-2">
 <div class="input-group-prepend">
 <div class="input-group-text"><i class="fa fa-user text-info"></i></div>
 </div>
 <input type="text" class="form-control" id="username" name="username" placeholder="Input username here" required>
 </div>
 </div>
 <div class="form-group">
 <div class="input-group mb-2">
 <div class="input-group-prepend">
 <div class="input-group-text"><i class="fa fa-key text-info"></i></div>
 </div>
 <input type="password" class="form-control" id="password" name="password" placeholder="your password here" required>
 </div>
 </div>

 <div class="text-center">
 <input type="submit" value="Login" name="login" class="btn btn-info btn-block rounded-0 py-2">
 </div>
 </form>
 </div>

 </div>


 </div>
 </div>
<?php }?>
</div>


</head>
<body>

</body>
</html>
<?php
$conn->close();
?>


composer require firebase/php-jwt require_once('vendor/autoload.php');
use \Firebase\JWT\JWT; private {
$payload = array(
'iss' => $_SERVER['HOST_NAME'],
'exp' => time()+600, 'uId' => $UiD
);
try{
$jwt = JWT::encode($payload, $this->Secret_Key,'HS256'); $res=array("status"=>true,"Token"=>$jwt);
}catch (UnexpectedValueException $e) {
$res=array("status"=>false,"Error"=>$e->getMessage());
}
return $res;
}
$return['status']=1;
$return['_data_']=$UserData[0];
$return['message']='User Logged in Successfully.';

 $jwt=$obj->generateToken($UserData[0]['id']);
 if($jwt['status']==true)
 {
 $return['JWT']=$jwt['Token'];
 }
 else{
 unset($return['_data_']);
 $return['status']=0;
 $return['message']='Error:'.$jwt['Error'];
 }

UserBlogs public function Authenticate($JWT,$Curret_User_id)
{
try {
$decoded = JWT::decode($JWT,$this->Secret_Key, array('HS256'));
$payload = json_decode(json_encode($decoded),true);
if($payload['uId'] == $Curret_User_id) {
$res=array("status"=>true);
}else{
$res=array("status"=>false,"Error"=>"Invalid Token or Token Exipred, So Please login Again!");
}
}catch (UnexpectedValueException $e) {
$res=array("status"=>false,"Error"=>$e->getMessage());
}
return $res;
}
UserBlogsUserBlogs if(isset($_POST['Uid']))
{
$resp=$obj->Authenticate($_POST['JWT'],$_POST['Uid']);
if($resp['status']==false)
{
$return['status']=0;
$return['message']='Error:'.$resp['Error'];
}
else{
$blogs=$obj->get_all_blogs($_POST['Uid']);
if(count($blogs)>0)
{
$return['status']=1;
$return['_data_']=$blogs;
$return['message']='Success.';
}
else
{
$return['status']=0;
$return['message']='Error:Invalid UserId!';
}
}
}
else
{
$return['status']=0;
$return['message']='Error:User Id not provided!';
}


<?php
header("Content-Type: application/json; charset=UTF-8");
require_once('vendor/autoload.php');
use \Firebase\JWT\JWT;
class DBClass {
private $host = "localhost";
private $username = "root";
private $password = ""; private $database = "news";
public $connection;
private $Secret_Key="*$%43MVKJTKMN$#";
public function connect(){
$this->connection = null;
try{
$this->connection = new PDO("mysql:host=" . $this->host . ";dbname=" . $this->database, $this->username, $this->password);
$this->connection->exec("set names utf8");
}catch(PDOException $exception){
echo "Error: " . $exception->getMessage();
}
return $this->connection;
}
public function login($email,$password){
if($this->connection==null)
{
$this->connect();
}
$query = "SELECT id,name,email,createdAt,updatedAt from users where email= ? and password= ?";
$stmt = $this->connection->prepare($query);
$stmt->execute(array($email,md5($password)));
$ret= $stmt->fetchAll(PDO::FETCH_ASSOC);
return $ret;
}
public function get_all_blogs($Uid){
if($this->connection==null)
{
$this->connect();
}
$query = "SELECT b.*,u.id as Uid,u.email as Uemail,u.name as Uname from blogs b join users u on u.id=b.user_id where b.user_id= ?";
$stmt = $this->connection->prepare($query);
$stmt->execute(array($Uid));
$ret= $stmt->fetchAll(PDO::FETCH_ASSOC);
return $ret;
}
public function response($array)
{
echo json_encode($array);
exit;
}
public function generateToken($UiD)
{
$payload = array(
'iss' => $_SERVER['HOST_NAME'],
'exp' => time()+600, 'uId' => $UiD
);
try{
$jwt = JWT::encode($payload, $this->Secret_Key,'HS256'); $res=array("status"=>true,"Token"=>$jwt);
}catch (UnexpectedValueException $e) {
$res=array("status"=>false,"Error"=>$e->getMessage());
}
return $res;
}
public function Authenticate($JWT,$Current_User_id)
{
try {
$decoded = JWT::decode($JWT,$this->Secret_Key, array('HS256'));
$payload = json_decode(json_encode($decoded),true);
if($payload['uId'] == $Current_User_id) {
$res=array("status"=>true);
}else{
$res=array("status"=>false,"Error"=>"Invalid Token or Token Exipred, So Please login Again!");
}
}catch (UnexpectedValueException $e) {
$res=array("status"=>false,"Error"=>$e->getMessage());
}
return $res;
}
}
$return=array();
$obj = new DBClass();
if(isset($_GET['action']) && $_GET['action']!='')
{
if($_GET['action']=="login")
{
if(isset($_POST['email']) && isset($_POST['password']))
{
$UserData=$obj->login($_POST['email'],$_POST['password']);
if(count($UserData)>0)
{
$return['status']=1;
$return['_data_']=$UserData[0];
$return['message']='User Logged in Successfully.';
$jwt=$obj->generateToken($UserData[0]['id']);
if($jwt['status']==true)
{
$return['JWT']=$jwt['Token'];
}
else{
unset($return['_data_']);
$return['status']=0;
$return['message']='Error:'.$jwt['Error'];
}
}
else
{
$return['status']=0;
$return['message']='Error:Invalid Email or Password!';
}
}
else
{
$return['status']=0;
$return['message']='Error:Email or Password not provided!';
}
}
elseif($_GET['action']=="UserBlogs")
{
 if(isset($_POST['Uid']))
 {

 $resp=$obj->Authenticate($_POST['JWT'],$_POST['Uid']);
 if($resp['status']==false)
 {
 $return['status']=0;
 $return['message']='Error:'.$resp['Error'];
 }
 else{
 $blogs=$obj->get_all_blogs($_POST['Uid']);
 if(count($blogs)>0)
 {
 $return['status']=1;
 $return['_data_']=$blogs;
 $return['message']='Success.';
 }
 else
 {
 $return['status']=0;
 $return['message']='Error:Invalid UserId!';
 }
 }
 }
 else
 {
 $return['status']=0;
 $return['message']='Error:User Id not provided!';
 }
}
}
else
{
$return['status']=0;
$return['message']='Error:Action not provided!';
}
$obj->response($return);
$obj->connection=null;
?>
 g10dra 159,399
  mike 109,843
  crocodile2u 107,727
  harikrishnanr 85,047
  christiemarie 81,120
  calevans 55,185
  dmamontov 55,101
  MindNovae 54,994
  HowTos 24,939
  tanja
tanja SPONSORS

SPONSORS

 Nomad PHP